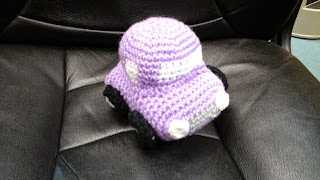
A few days ago, I made a little toy car from a pattern I found on Ravelry.
It turned out cute, but the pattern had so many little pieces (18 in all) that it drove me crazy. As I was sewing things together, I was thinking that it would be so much easier to change colors to put in the windows, or the bumpers, and those tires could be one piece instead of two...
And so I played. I deliberately didn't do an exact copy of the pattern, with color, eyes, size... I just played with making a car with as few pieces as possible. My Pudgy Purple Car has eight pieces instead of 18, and many of them were sewed on before stuffing to make things easier (at least I think it's easier).
My finished car is about 5-1/2" long, 5" high and 5" wide, just right for little hands to hold. There are two main pieces: the car's body and the roof. The bumper and windows are "built in" through color changes, and wheels and headlights are made separately and sewn on.
Uses Size F hook
Worsted weight yarn - about an ounce and a half of main color, small quantities of white, gray and black for details
Headlights (Make 2)
With white, make 8 SC in a magic ring. Pull closed and join with slip stitch. Finish off, leaving tail for sewing on.
Tires (Make 4)
Round 1: With gray, 8 SC in magic ring. Pull tight. Join with slip stitch. Change color to black.
Round 2: 2 sc in each stitch around (16 stitches)
Round 3: sc in each stitch around (16)
Round 4: dec around (8 stitches)
Round 5: dec around (4 stitches)
Finish off, leaving tail for sewing on.
Body of car:
Round 1: With gray, chain 10. 3 sc in 2nd chain from hook. SC in next 7 stitches, 3 sc in next stitch. Working along bottom of chain, work a sc in the next 7 stitches, joining with a slip stitch to your first SC. Change to main color. (20 stitches)
Round 2: 2 sc in each of the first 3 stitches, SC in next 7 stitches, 2 SC in each of the next 3 stitches, sc in the next 7 stitches (26 stitches)
I like to sew my headlights on around this point, while it's still easy to access the front bumper from the back.
Round 3: 2 SC in each of the first two stitches, SC in next two stitches, 2 SC in each of the next two stitches, SC in the next seven stitches, 2 SC in each of the next two stitches, SC in next two stitches, 2 SC
in each of the next two stitches, SC in the next seven stitches (basically, you are doing double increases at each of the four corners) (34 stitches)
Work even on those 34 stitches for 17 rows (about 3").
Decrease row: work 3 decreases at each "corner". Change to gray for back bumper.
Work one row of SC with gray. Finish off, leaving a long tail for sewing.
Stuff lightly and sew up back bumper.
You can either sew the tires on before stuffing (a little easier because you can get to the back of where you're sewing), or sew them on once the body is stuffed. I sewed mine on before stuffing, and the wheels don't quite touch the ground. Oops.
Roof:
Round 1: With main color, make 8 SC in magic ring. Pull tight. (8)
Round 2: 2 SC in each stitch around (16)
Round 3: 2 SC in stitch, SC in next stitch, repeat around (24)
Round 4: 2 SC in stitch, SC in next two stitches, repeat around (32)
Round 5: 2 SC in stitch, SC in next three stitches, repeat around (40)
Round 6:
SC in first three stitches, change color to white, SC in next 10 stitches, change color to main, SC in next 3 stitches, change color to white, SC in next 4 stitches, change color to main, SC in next 3 stitches, change color to white, SC in next 10 stitches, change color to main, SC in next 3 stitches, change color to white, SC in next 4 stitches
In other words... you are doing SC around with color changes to put in the windows
3 purple, 10 white (windshield), 3 purple, 4 white (side window), 3 purple, 10 white (back window), 3 purple, 4 white (side window)
Repeat the window round 2 more times, then do one round of main color. Finish off, leaving a tail to sew on.
Center the roof on the top of the car's body and sew on three sides... lightly stuff through the opening, and then finish sewing it shut.
These are my pattern notes... aren't you glad I typed them out for you?


Thank you for taking the time to "type" out your pattern, Looks nice and doable for me. I'm going to use punch embroidery thread and turn "him" into a keychain.
ReplyDeleteyes, thank you very much! ;-)
ReplyDelete