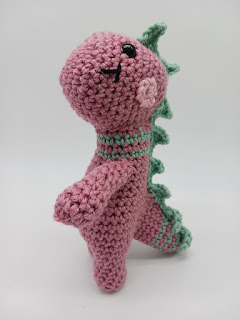
Mini Dino
Head: Using main color, begin at nose
Round 1: 6 sc in MR. (6)
Round 2: inc x 6. (12)
Round 3: *sc, inc* x 6. (18)
Round 4: *sc 2, inc* x 6. (24)
Round 5: *sc 3, inc* x 6. (30)
Rounds 6-11: sc 30. (30)
Round 12: *sc 3, dec* x 6. (24)
Rounds 13-14: sc 24. (24)
Place 12 mm safety eyes between rounds 9 & 10 with 8 stitches between. I fold the head in half and count down 4 stitches from the top on each side.
Round 15: *sc 2, dec* x 6. (18)
Round 16: *sc, dec* x 6. (12)
Round 17: dec x 6. (6)
Body (starting with legs)
Leg 1:
Round 1: 5 sc in MR. (5)
Round 2: inc x 5. (10)
Round 3: BLO sc 10. (10)
Rounds 4-6: sc 10. (10)
FO leg 1. Make another, but do not finish off.
Round 7: ch 2, work 10 sc around leg one, work 2 sc in connecting chain, work 10 sc around second leg, then 2 sc in back of connecting chain. (24) Place your stitch marker at the center of the back.
Round 8: *sc 3, inc* x 6 (30)
Round 9-10: sc 30. (30)
Round 11: *sc 4, inc* x 6 (36)
Round 12-13: sc 36. (36)
Round 14: *sc 4, dec* x 6. (30)
Round 15-16: sc 30. (30)
Round 17: *sc 3, dec* x 6. (24)
Rounds 18-19: sc 24. (24)
Round 20: sc 8, dec x 4, sc 8. (20) These decreases should be over the front of the dinosaur.
Round 21: sc 7, (sc, dec) x 2, sc 7 (18)
Change to contrast color.
Round 22: sc 18. (18)
Change to main color.
Round 23: sc 18. (18)
Change to contrast color.
Round 24: sc 18. (18)
Change to main color.
Round 25: sc 18. (18) FO, leaving tail to sew head to body.
Arms (make two with main color)
Round 1: 5 sc in MR. (5)
Round 2: inc x 5. (10)
Rounds 3-4: sc 10. (10)
Stuff hand a little, but leave the rest of the arm unstuffed.
Round 5: *sc 3, dec* x 2. (8)
Round 6: *sc 2, dec* x 2. (6)
Rounds 7-10: sc 6. (6)
Finish off, leaving a long tail to sew to body.
Tail: After a few set-up rows, the increases will be at the top of the tail, with 3 sc in one stitch (3 sc)
Start with main color
Round 1: 5 sc in MR. (5)
Change to contrast color
Round 2: *sc, inc* x 2, sc. (7)
Change to main color.
Round 3: *sc 2, inc* x 2, sc. (9)
Change to contrast color.
Round 4: sc 4, (3 sc), sc 4. (11)
Change to main color.
Round 5: sc 11. (11)
Change to contrast color.
Round 6: sc 5, (3 sc), sc 5. (13)
Change to main color.
Round 7: sc 13. (13)
Change to contrast color.
Round 8: sc 6, (3 sc), sc 6. (15)
Change to main color. Finish off contrast color.
Round 9: sc 15. (15)
Round 10: sc 7, (3 sc), sc 7. (17)
Round 11: sc 17. (17)
Round 12: sc 8, (3 sc), sc 8. (19)
Round 13: sc 19. (19)
FO, leaving a long tail to sew to body.
Cheeks – with pink yarn. Make two.
SC 4 in MR. FO, leaving a tail to sew to face.
Assembly: sew head to body, placing the back of the head at the back of the neck. Sew the cheeks 2-3 stitches below the eye, set slightly back from the eye. Embroider a smile 2-3 stitches below the eye, slightly in front of the eye.
Sew the arms on the side of the body, just under the neck stripes. You can sew them on pointing straight down, or angled slightly toward the front of the body. Pin the tail on the back of the dinosaur, making sure it balances him so that he can stand. Sew tail to body.
Spikes: make 1 with contrast color
First spike: Ch 5. Starting in 2nd ch from hook, sl st, sc, hdc, dc.
Remaining spikes: Ch 7. Starting in 2nd ch from hook, sl st, sc, hdc, dc.
Repeat spikes until you have enough to go from the end of the tail to the center of the head. I made 8 spikes.
Sew spikes to body. Use tail from spikes to embroider nostrils on the nose of your dino. (Which I forgot to do on two of the dinosaurs!)
I did go through several changes in the spikes.


No comments:
Post a Comment