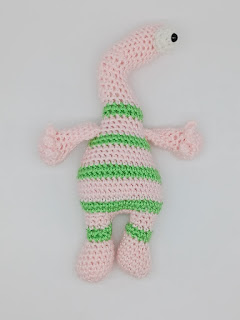
Well, now... this one took a while! I finished version 1.0 on February 10th.
I wasn't quite happy with the bend of the neck. My original drawing had the neck bending down more. And I had originally planned for the arms to be no-sew.
So I made version 2.0 on March 12 - the neck bent a little more, but I made it with a boucle yarn which made counting my stitches difficult, so the size of the neck/head varied... And oops, I sewed the eye on the wrong side! My color changes are showing!
My granddaughter Aliya drew me a color sketch for version 3.0 when I was visiting her March 15-17, and I finished up her monster on March 20.
She explained to me that the white stripes should be green, and the eye should be yellow instead of orange.
I still wasn't happy with this version. I used short rows for the neck, and thought it would be very difficult to write up as a pattern, and it wouldn't be as beginner-friendly! So I made one more...
I used ombre, so I didn't have to worry about color changes. I finished this one up on March 21...
So, here goes... I made my monsters with worsted weight yarn and an F hook. (Well, the green/orange monster did use two strands of lighter weight yarn for the orange). It takes less than 2 ounces of yarn total, so you can pull some small balls from your scrap bin. I would recommend sketching up your color scheme before you start, so you can plan out how many rows of each color you will have for your stripes.
We start at the bottom, making one leg, then the other, and join the legs to continue on with the body.
Leg: start with main color
Round 1) 6 sc in MR (6)
Round 2) inc x 6 (12)
Round 3) *sc, inc* x 6 (18)
Round 4) sc 6, inc x 6, sc 6 (24)
Round 5) sc 10, dec x 2, sc 10 (22) The decreases opposite your starting point shape the foot.
Round 6) sc 9, dec x 2, sc 9 (20)
Round 7) sc 8, dec x 2, sc 8 (18)
Round 8) sc 5, dec x 4, sc 5 (14)
Round 9) sc 3, dec x 4, sc 3 (10) (for my pink/green monster, I started stripes here)
Rounds 10-13: sc (10)
For leg one, you finish off after round 13.
After leg two, continue on to Body:
Round 14: ch 4. Starting in the back of leg 1 (the beginning of the round), sc 10 around leg 1, then sc in each chain of the connecting chain. Make 10 sc around leg 2, and 4 sc in the back of the connecting chain. Place your stitch marker in the center of the back (2 stitches back) to keep your color changes centered on the back.
This varies from how most bottom-up amigurumi with shaped feet are made... usually you would sc over to the side of the foot before chaining, and join to the side of foot one. I wanted my monster to have his feet facing outwards.
As you continue working on the body, change colors as you indicated on your color scheme sketch. Stuff as you go. It is easiest to stuff the legs before you start decreasing on the body.
Round 15: *sc 3, inc* x 7 (35)
Round 16-17: sc (35)
Round 18: *sc 4, inc* x 7 (42)
Rounds 19-21: sc (42)
Rounds 22-33 (12 rows) - decrease at sides, adding arms (see below) around row 31
You are decreasing two stitches on each row, at the sides of your monster, working your way down to 18 stitches.
Arms
At row 31 (give or take a row... depending on your stripe pattern. You want the arms to be your main color.) At the each side of the row, work your arm: ch 20, sl st 3, *ch 4, sl st 3* twice (you must made three fingers), hdc in each remaining chain.
Rounds 34-37 (4 rows): sc (18)
From this point on, use only the body color.
Neck shaping
Rounds 35-54 (20 rows): sl st 3, sc 3, hdc 6, sc 3, sl st 3 (18)
Your hdc should fall on the side of the neck. Make sure you do your slip stitches loosely, so you can crochet easily into them on the next row. Stuff as you go.
Round 55: *sc, dec* x 6 (12)
Round 56: dec x 6 (6)
Finish off, leaving a tail. Using a yarn needle, weave your tail through the front loops of round 56. Pull to close. Tie off and weave in your yarn end.
Eyeball: with white (or, in the case of Aliya's sketch, yellow)
Round 1: 5 sc in MR (5)
Round 2: inc x 5 (10)
Round 3: sc (10)
Finish off, leaving a tail to sew to head.
Place a safety eye in the center of your MR. I used a 9 mm safety eye for most of the monsters, but for Aliya's monster with the yellow eye, I went with a 12 mm eye.
Sew eye to head 4-5 rows from the end, adding a bit of stuffing. I found it was easiest to sew the eye on halfway, push in a little stuffing, then finish sewing.
He's done! If you're on Ravelry, I'd love to see your version of Mr. February! Or you can tag @penguinplacecrafts on Instagram!


