Monday, May 25, 2015

The June Penguin Pail

Here are most of the projects I made from the bin of yarn for my Giveaway challenge, filling the "Color Bag" category.
For April and May, I finished up my Penguin Pail before I ran out of month... so I guess I'll have to be a little more ambitious than ten projects. I came up with the idea to make up a looser list - a grid of twelve projects that should keep me busy for a month:

Here's an explanation of the squares: 
(Done - Zeke) Critter corner = one of my best seller stuffed animals, like giraffe or monkey
(Done - Mermaid) Fantasy land = mermaid, dinosaur or unicorn
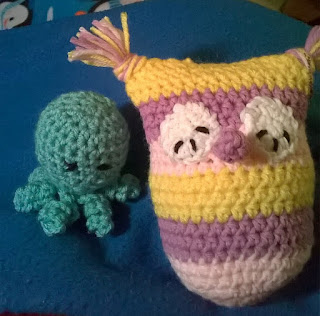
(Done - Striped Owl) Scrap = anything that uses the small balls of yarn left after bigger projects

(Done - Bear, Turtle) African Flower = something using the new pattern I learned doing May's Fancy Owl
(Done - Sid the Squid) Variegated = anything using up variegated yarn
(Done - made a fancy owl) Rock the Croc = something using crocodile stitch
(Done - Pretty Pink Tractor) Vehicle = plane train, automobile, tractor
(Done) - Four Square = finish four squares of a specialty granny square for a blanket
(Done, with my "use it up" challenge) Color bag = 4 or 5 coordinating colors in a project bag, make stuff till yarn is used up
(Done - Twirly Bird) - Design = Work on a design idea
(Done) Minion - Anything Minion
(Done - Cupcake Purse) Purse - cute little kid's purse


It will be interesting to see how this plays out. Some items will cover more than one square... for instance, I'm working on a new Minion design today, so that would cover both the Minion square and the Design square. When my daughter (who is far better with colors than I) makes up the color bag for me, it may be used for Critter Country and African Flower).

Even though there are twelve squares, I will end up with more than 12 projects, due to the "Color Bag" and "Variegated" options. For those, I want to use up the yarn, so I'll end up making whatever it takes to use up the skeins.

Okay, here goes...


First project finished - a pair of Mermaids. Technically  they  fit three categories: Fantasy Land, variegated, and scrap yarn. I will count them as Fantasy  Land.

Now, designing a vehicle. If you have ever seen Tim Hawkins sing Little Pink Tractor, you should love this one!


Tuesday 6/2 was a busy day, with time waiting during medical appointments and a lot of time in the car. Finished off two little projects that will qualify for the "Scrap" category.


Finished up my "pretty pink tractor" - but I want to tweak the pattern a bit. I got the texture I wanted on the tires, but my double crochet stitch lets the white stuffing show through. And the top of the tractor is supposed to be pink, too. This one fits the categories Vehicle, Scrap and Design... but I will count it towards Vehicle.


Zeke the Giraffe finishes off Critter Country
Owl made with the Crocodile Stitch

African Flower category - Turtle


Since I was having such fun with African flower projects, I made another one!

For the Purse category, I made a cupcake purse.
Cross Minion off the list!
Four Monester squares done

Here is Sid the Short-Changed Squid. He only has 7 legs, since I ran out of yarn...


Tuesday, May 19, 2015

Top-Down Colorful Monkey


I like making projects with as little sewing as possible… sometimes when I sew the head onto the body of a critter, it doesn’t turn out quite the way I want it to. So, for this pattern, I wanted to make the head and body one piece. I start at the top of this cute little monkey with  the curl, and work down to the bottom. I crocheted the arms on while making the body, but wasn’t 100% happy with the way they sit. I think with my next colorful monkey, I will sew the arms like as I did with the legs.
I used worsted weight yarn and a size G hook.  I had partial skeins of green, blue, pink, lavender and tan from another project that I used on this (and I still have an ounce or more left from most skeins). I’d say you need 2-3 ounces of each color.
This was  my starting sketch for color choices: 


I made the mouth and eyes first, so I could sew them on before stuffing the head. 

Mouth: 
The mouth is worked in continuous rounds without joining
Chain 12
SC in 2nd chain from hook and next 9. 3 SC in last. Working on opposite side, work one sc in the next 9 starting chains. Work two more sc in original stitch. Place a marker (my scrap of tan yarn in the picture below) to remind yourself which end is your starting end.

Round 2: 2 sc in next stitch (corner), sc in next 9 stitches, 2 sc in next (corner), sc in next two stitches, 2 sc in next stitch (corner), sc in next 9 stitches, 2 sc in next stitch (corner)
Rounds 3-4, sc around with 2 sc in each corner
(I found it easier to embroider the smile and nostrils at this point, before I started working the even rounds that make the mouth cup up.)
Rounds 5-7 sc around, leaving a long tail for sewing.

Eyes: 
Large colored part (make 2):
Chain 5
SC in 2nd chain from hook and next two stitches, 3 sc in next, sc in the back side of the chain for 3 stitches.
Ch 1, turn. sc in three stitches, 2 sc in each of the next three stitches, sc in next three stitches. Finish off, leaving long tail to sew on. 
Black part:  (make 2)
Make 5 sc in MR. Tighten ring, but do not join.

Sew black part onto colored part. Sew onto face over rows 8-12. Sew mouth centered below eyes, stuffing as you sew.


Head: 
Starting at the top with the color you have chosen for the head. Head and body are made in continuous rounds without joining at the end of each round.

Curl + Round 1
You start with the little curl on the top of the monkey's head: 
Chain 12
3 sc in 2nd chain from and and next 9 chains. In last chain, do 6 sc. 

Round 1: Work 2 sc in each of the 6 sc you made in the last stitch, being careful to keep the curl on top of your work. (12 stitches)
Round 2: sc 1, inc in next stitch, repeat around (18)
Round 3: sc in 2 stitches, inc in next stitch, repeat around (24)
Round 4: sc in 3 stitches, inc in next stitch, repeat around (30)
Round 5: sc in 4 stitches, inc in next stitch, repeat around (36)
Round 6: sc in 5 stitches, inc in next stitch, repeat around (42)
Round 7: sc in 6 stitches, inc in next stitch, repeat around (48)
Round 8: sc in 7 stitches, inc in next stitch, repeat around (54)
Round 9: sc in 8 stitches, inc in next stitch, repeat around (60)
Rounds 10-13: sc around (60 stitches)
Round 14: sc in 8 stitches, dec over next two stitches, repeat around (54)
Round 15: sc in 7 stitches, dec over next two stitches, repeat around (48)
Round 16: sc in 6 stitches, dec over next two stitches, repeat around (42)

Round 17: sc in 5 stitches, dec over next two stitches, repeat around (36)
Round 18: sc in 4 stitches, dec over next two stitches, repeat around (30)
Round 19: sc in 3 stitches, dec over next two stitches, repeat around (24)
Round 20: sc in 2 stitches, dec over next two stitches, repeat around (18)
Stuff while the hole is still big enough to get the stuffing in! 
Rounds 21-22: sc around (18)
 Change to the top color you will be using for the body

Body
Round 1: sc in 2 stitches, inc in next stitch, repeat around (24)
Round 2: sc in 3 stitches, inc in next stitch, repeat around (30)
Round 3: sc in 4 stitches, inc in next stitch, repeat around (36)
Round 4: sc in 5 stitches, inc in next stitch, repeat around (42)
Round 5: sc in 6 stitches, inc in next stitch, repeat around (48)
Round 6: sc in 7 stitches, inc in next stitch, repeat around (54) 
Round 7:  sc in 8 stitches, inc in next stitch, repeat around (60)
Rounds 8: sc around (60)
Change to middle color you will be using for body
Rounds 9-16: sc around
Change to bottom color you will be using for body:
Round 17: sc in 8 stitches, dec over next two stitches, repeat around (54)
Round 18: sc in 7 stitches, dec over next two stitches, repeat around (48)
Round 19: sc in 6 stitches, dec over next two stitches, repeat around (42)
Round 20: sc in 5 stitches, dec over next two stitches, repeat around (36)
Round 21 sc in 4 stitches, dec over next two stitches, repeat around (30)
Round 22: sc in 3 stitches, dec over next two stitches, repeat around (24)
Round 23: sc in 2 stitches, dec over next two stitches, repeat around (18)
 Stuff while the hole is still big enough to get the stuffing in! 
Round 24: sc in 1 stitch, dec over next two stitches, repeat around (12)
Round 25: dec around (6)
Finish off, leaving tail to sew the opening closed. 

Arms: Make 2
Round 1: 5 sc in Magic Ring. Pull tight
Round 2: 2 sc in each stitch around (10)
Round 3: 1 sc in next stitch, inc in next, repeat around (15)
Rounds 4-5: work even 
Change color
Continue to work even until the arm measures 8" long, stuffing as you go.

I attached the arms around Round 3 of the body, crocheting through both layers of the arm while doing Round 3, but I think they might look better sewed on.

Legs:Make 2
Round 1: 6 sc in Magic Ring. Pull tight
Round 2: 2 sc in each stitch around (12)
Round 3: 1 sc in next stitch, inc in next, repeat around (18)
Rounds 4-6: work even 
Change color
Continue to work even until the leg measures 10" long, stuffing as you go.

Tail: 
 Round 1:
4 sc in magic ring. Pull tight
Round 2: inc in first stitch, sc in each stitch around (5) (use a stitch marker to show start of row)
Round 3:  inc in first stitch, sc in each stitch around (6)
Round 4:  inc in first stitch, sc in each stitch around (7)
Round 5:  inc in first stitch, sc in each stitch around (8)
Round 6:  inc in first stitch, sc in each stitch around (9)
Round 7:  inc in first stitch, sc in each stitch around (10)
Round 8:  inc in first stitch, sc in next four stitches, decrease over next two stitches, sc in next two stitches (10)
Continue to repeat row 8 until the tail is desired length (8 - 12"), stuffing as you go. Every few inches you can skip the decrease to make the tail a little wider. I think overall I ended up with fourteen stitches by the end of the tail.
(increasing on one side and doing a decrease opposite it will give the tail a curve)

Ears:
Start at the center of the ear with your accent color: 
Round 1: 6 sc in magic ring. Pull tight
Round 2: increase in each stitch around (12 stitches). Change color to the one you used for the head.
Round 3: Sc in first stitch, increase in next. repeat around (18)
Round 4: Sc in first stitch, decrease over next two stitches, repeat around (12)
Round 5: Dec around (6)
Round 6: Dec around (3)
Finish off, leaving a long tail to sew onto side of head.


Friday, May 15, 2015

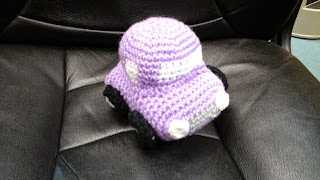
Pudgy Purple Car pattern

A few days ago, I made a little toy car from a pattern I found on Ravelry.


It turned out cute, but the pattern had so many little pieces (18 in all) that it drove me crazy. As I was sewing things together, I was thinking that it would be so much easier to change colors to put in the windows, or the bumpers, and those tires could be one piece instead of two...

And so I played. I deliberately didn't do an exact copy of the pattern, with color, eyes, size... I just played with making a car with as few pieces as possible. My Pudgy Purple Car has eight pieces instead of 18, and many of them were sewed on before stuffing to make things easier (at least I think it's easier).

My finished car is about 5-1/2" long, 5" high and 5" wide, just right for little hands to hold. There are two main pieces: the car's body and the roof. The bumper and windows are "built in" through color changes, and wheels and headlights are made separately and sewn on.

Uses Size F hook
Worsted weight yarn - about an ounce and a half of main color, small quantities of white, gray and black for details

Headlights (Make 2)
With white, make 8 SC in a magic ring. Pull closed and join with slip stitch. Finish off, leaving tail for sewing on.

Tires (Make 4)
Round 1: With gray, 8 SC in magic ring. Pull tight. Join with slip stitch. Change color to black.
Round 2: 2 sc in each stitch around (16 stitches)
Round 3: sc in each stitch around (16)
Round 4: dec around (8 stitches)
Round 5: dec around (4 stitches)
Finish off, leaving tail for sewing on.

Body of car:
Round 1: With gray, chain 10. 3 sc in 2nd chain from hook. SC in next 7 stitches, 3 sc in next stitch. Working along bottom of chain, work a sc in the next 7 stitches, joining with a slip stitch to your first SC. Change to main color. (20 stitches)
Round 2: 2 sc in each of the first 3 stitches, SC in next 7 stitches, 2 SC in each of the next 3 stitches, sc in the next 7 stitches (26 stitches)

I like to sew my headlights on around this point, while it's still easy to access the front bumper from the back.

Round 3: 2 SC in each of the first two stitches, SC in next two stitches, 2 SC in each of the next two stitches, SC in the next seven stitches, 2 SC in each of the next two stitches, SC in next two stitches, 2 SC in each of the next two stitches, SC in the next seven stitches  (basically, you are doing double increases at each of the four corners) (34 stitches)

Work even on those 34 stitches for 17 rows (about 3").
Decrease row: work 3 decreases at each "corner". Change to gray for back bumper.
Work one row of SC with gray. Finish off, leaving a long tail for sewing.
Stuff lightly and sew up back bumper.

You can either sew the tires on before stuffing (a little easier because you can get to the back of where you're sewing), or sew them on once the body is stuffed. I sewed mine on before stuffing, and the wheels don't quite touch the ground. Oops.

Roof:
Round 1: With main color, make 8 SC in magic ring. Pull tight.  (8)
Round 2: 2 SC  in each stitch around (16)
Round 3: 2 SC in stitch, SC in next stitch, repeat around (24)
Round 4: 2 SC in stitch, SC in next two stitches, repeat around (32)
Round 5: 2 SC in stitch, SC in next three stitches, repeat around (40)
Round 6:
 SC in first three stitches, change color to white, SC in next 10 stitches, change color to main, SC in next 3 stitches, change color to white,  SC in next 4 stitches, change color to main, SC in next 3 stitches, change color to white,  SC in next 10 stitches, change color to main, SC in next 3 stitches, change color to white,  SC in next 4 stitches

In other words... you are doing SC around with color changes to put in the windows
3 purple, 10 white (windshield), 3 purple, 4 white (side window), 3 purple, 10 white (back window), 3 purple, 4 white (side window)

Repeat the window round 2 more times, then do one round  of main color. Finish off, leaving a tail to sew on.

Center the roof on the top of the car's body and sew on three sides... lightly stuff through the opening, and then finish sewing it shut.
These are my pattern notes... aren't you glad I typed them out for you?